It is currently 15 May 2024, 03:29


Hughes module battery contact pad

For electronic related stuff like module repair, silver epoxy fixes etc.
  • Author
  • Message
Offline
User avatar

LEDluvr

Guru

Guru

  • Posts: 1001
  • Joined: 06 Jun 2007, 22:49
  • Location: Los Angeles

Hughes module battery contact pad

Post23 Feb 2009, 01:41

Hey all,

I have a larger digit Hughes module that had some of the "green death" leaked onto the negative battery contact pad. I cleaned it up with iso alcohol and most of the pad came off. I put in new batteries just for the heck of it - and it lit up! :o

Sometimes I get a "0" or a "1" in one of the two right fields, and sometimes I get it to the setting stage, i.e.- the "1 -" for setting the month. But it won't let me set it. At this point I'd like to try to repair the negative battery contact pad to see it it's a runner. Any suggestions??

Image

Image

~:(
Offline
User avatar

Led-Time

Guru

Guru

  • Posts: 971
  • Joined: 05 Jun 2005, 00:28
  • Location: Scotland

: Hughes module battery contact pad

Post23 Feb 2009, 02:29

I've had similar problems with Hughes modules its usually the quartz crystal that’s either given up or its come loose they are not soldered to the pcb some kind of glue/sealing substance is used to hold the little connectors on. I've had great results soldering the quartz crystal to the board its quite fiddly though as you have to take the cover off the led display exposing the wire bonds, cleaning the pads and glue off requires a very steady hand one slip can ruin the module.

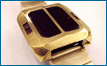
Its easy to make a new battery contact pad cut a little round bit of brass shim and solder it straight on, job done.
Offline
User avatar

LEDluvr

Guru

Guru

  • Posts: 1001
  • Joined: 06 Jun 2007, 22:49
  • Location: Los Angeles

: Hughes module battery contact pad

Post25 Feb 2009, 01:08

Hi Klippie,
thanks for the info. I was thinking the quartz crystal could also be at play here. Taking off the cover of the LED display :-( - sounds like it's not as easy to replace the q.c. on a Hughes as it is on other modules. About soldiering on a brass contact pad - are there specific spots where I should apply the solder? Or just do the entire circumference of the pad?

Thx! ;-)
Offline
User avatar

fronzelneekburm

Guru

Guru

  • Posts: 1616
  • Joined: 05 Jan 2004, 15:15
  • Location: Kerpen, Germany

: Hughes module battery contact pad

Post25 Feb 2009, 01:47

if you arent good at soldering such small stuff, you can also use "silver epoxy" or whatever that stuff is called outside germany. Its this glue-alike stuff, i just place a small drop with a needle at the lose contact and cross fingers... but if you're good with micro-soldering it is of course the better idea. Solder from a leg of the crystal to the contact point on the board...which might be hard to do unless you have good eyes and calm fingers.
Offline
User avatar

LEDluvr

Guru

Guru

  • Posts: 1001
  • Joined: 06 Jun 2007, 22:49
  • Location: Los Angeles

: Hughes module battery contact pad

Post26 Feb 2009, 03:17

Thanks Fronzelneekburm,
I don't have any recent experience with soldering and what experience I did have is many years ago and quite limited. Your suggestion of silver exoxy might be the best bet for me.
I'm wondering - if I gently remove the cover from the q.c, can't I just solder or silver epoxy from that side, rather than removing the clear cover from the l.e.d.s ?
Offline
User avatar

retroleds

Guru

Guru

  • Posts: 3636
  • Joined: 04 Feb 2006, 10:34
  • Location: Surrounded by hicks and sticks (farms and woods) - Michigan,USA

: Hughes module battery contact pad

Post26 Feb 2009, 06:30

Soldering the brass pad - clean it good on one side, appiy a little solder flux,touch hot iron to it(still not in module, on a heat resistant surface) then touch solder to it - some solder will flow across it almost immediatly. Clean module contact, small wipe of flux(very little is needed, just the thnnest film), lay brass contact with soldered side DOWN, touch hot iron to top(battery contact) side for just 2 seconds. Pull off iron and blow on contact to cool. You are done.

Before you go on to the quartz: since your module was doused in the acid, a Hughes module will often, due to the ceramic substrate, have a lot of metal salts stuck to their surface, leading to erratic issues, such as stuck on, jumping thru settings,etc. Take a Q-tip and some clean water and wipe the board down good on the battery side and on the front side all around the LED cover. Or use a mild alkaline like the stuff for removing hard water spots from bathroom fixtures(I use CLR brand, personally). I've "fixed" many a Hughes module that was erratic by merely cleaning off the battery juices that dissolved some of the contact metals and then left them as a fine trace across or around the circuit board. There's not much you can hurt on a Hughes board. Bulletproof!

The quartz crystal. You don't have to remove the cover. Mix up some silver epoxy, dip a needle or other pointed object into it and pull away so you have a pointed "Drip". Gently stab that into the first hole(three on most Hughes, some later had only two), repeat for each hole, get a nice dab into them. Take a Q-tip dipped in some alcohol and clean off all smears outside the holes very good, then press the crystal back into the holes. Don't be tempted to put some on the crystal leads or leave some mounded outside the holes, whatever you get in the holes will be quite sufficient.[If it doesn't work, pull the cover and see how much got thrugh to the other side - although, there may still be a "cap" of the original silver epoxy over the holes on that side.] Then mix up some regular 5 minute epoxy and just put a small dab at each end of the crystal to hold it to the circuit board - the silver stuff is not very strong, mechanically speaking. Hold the crystal until the regular epoxy is set or put a rubber band or very weak clamp on it...I find those plastic clips meant for half-empty potato chip bags are a good, weak clamp. Wait at least 12 hours before testing the job - the silver epoxy conducts electricity much better when fully cured. Don't know why, just seems that way.

Those plastic "chip clips" - I find a big, wide one, with soft rubber on the jaws, is just right for holding a glued on Pulsar or Frontier module display after silver epoxying. 8-) Mmmm, chips, beer, epoxy. :mrgreen: Sorry I got so long. :oops:
http://www.retroleds.com - Sales of vintage LED, LCD, analog watches, parts and gadgets - repair tutorials & tips
Nov. 2022 - back in business!! BItter divorce is in home stretch, come grabs some great deals, I had to open the safe . . . damn attorneys. piss.
Offline
User avatar

charger105

Guru

Guru

  • Posts: 867
  • Joined: 02 Mar 2007, 02:11
  • Location: Australia

: Hughes module battery contact pad

Post26 Feb 2009, 09:11

Working from the QC side certainly sounds the safest/easiest way to go.
But how do you remove the QC to get access to the holes ? It's normally one of the rectangular fush mounting types ? Do you destroy the QC to get it off ?

Rgds,
Andrew.
Offline
User avatar

retroleds

Guru

Guru

  • Posts: 3636
  • Joined: 04 Feb 2006, 10:34
  • Location: Surrounded by hicks and sticks (farms and woods) - Michigan,USA

: Hughes module battery contact pad

Post26 Feb 2009, 16:30

The quartz crystals aren't soldered on, so you can grip the board firmly*(plastic battery hub/holder off), grip the crystal firmly, then push/tip the crystal to one side(like you are rolling it over onto one of it's long sides. The leads are very sturdy and only 2mm(1/16") long. I've done dozens of those without breaking a board...have a nice little container of crystals that were keeping good time, but the displays were shot or the logic had gone mildly schizophrenic. :x Actually much safer than trying to pry, as prying puts pressure in one spot, on a quite breakable ceramic based board.

Speaking of the battery holder/hub(what is a good name for that removable ring?) - be sure it clean it too if it was a battery leakage victim....there can be enough fine metal salts on the bottom to intermittently short against the various contacts. I going to take a major break from repairing starting March 1st- I am always happy to help others refine their techniques. Really only a few percent of collectors want to get into them that far....unfortunately. :-(
http://www.retroleds.com - Sales of vintage LED, LCD, analog watches, parts and gadgets - repair tutorials & tips
Nov. 2022 - back in business!! BItter divorce is in home stretch, come grabs some great deals, I had to open the safe . . . damn attorneys. piss.
Offline
User avatar

Led-Time

Guru

Guru

  • Posts: 971
  • Joined: 05 Jun 2005, 00:28
  • Location: Scotland

: Hughes module battery contact pad

Post26 Feb 2009, 23:27

I've seen that silver epoxy stuff in the elecronics store also the silver paint used for repairing car heated windscreens I've used this for repairing wire bonds with about 50% success only on the PCB though never on chips or displays.
Offline
User avatar

LEDluvr

Guru

Guru

  • Posts: 1001
  • Joined: 06 Jun 2007, 22:49
  • Location: Los Angeles

: Hughes module battery contact pad

Post27 Feb 2009, 03:41

Thanks Ed for the detailed walk through on the repair.
I'll follow your instructions to a 't' once I find some brass (or perhaps tin from a cookie tin?) to use for the battery contact pad.
I'll report my success (hopefully :o ) with pics once I'd done.
;-)
Offline
User avatar

clockace

Techno Mage

Techno Mage

  • Posts: 544
  • Joined: 25 Feb 2008, 03:28
  • Location: Arizona

: Hughes module battery contact pad

Post27 Feb 2009, 06:29

ace hdwe stores have brass shim stock. it comes in a sheet about 3"x8". thickness from about .002" up to.010" or so. i think a cookie tin will be too thick. peter.
Offline
User avatar

clockace

Techno Mage

Techno Mage

  • Posts: 544
  • Joined: 25 Feb 2008, 03:28
  • Location: Arizona

: Hughes module battery contact pad

Post27 Feb 2009, 06:30

ace hdwe stores have brass shim stock. it comes in a sheet about 3"x8". thickness from about .002" up to.010" or so. i think a cookie tin will be too thick. peter.
Offline
User avatar

retroleds

Guru

Guru

  • Posts: 3636
  • Joined: 04 Feb 2006, 10:34
  • Location: Surrounded by hicks and sticks (farms and woods) - Michigan,USA

: Hughes module battery contact pad

Post27 Feb 2009, 19:20

clockace(pete) - good suggestion. Other suppliers of copper shim are art supply stores, stained/leaded glass stores, some electronics stores and tool makers supply stores(they carry other shims that are handy - steel, spring steel, brass, copper).
http://www.retroleds.com - Sales of vintage LED, LCD, analog watches, parts and gadgets - repair tutorials & tips
Nov. 2022 - back in business!! BItter divorce is in home stretch, come grabs some great deals, I had to open the safe . . . damn attorneys. piss.
Offline
User avatar

LEDluvr

Guru

Guru

  • Posts: 1001
  • Joined: 06 Jun 2007, 22:49
  • Location: Los Angeles

: Hughes module battery contact pad

Post27 Feb 2009, 21:13

ace hdwe stores have brass shim stock. it comes in a sheet about 3"x8". thickness from about .002" up to.010" or so. i think a cookie tin will be too thick. peter.


Thanks clockace and Ed. Should I try to get the .002" thickness or the .010" or will either thickness do?
Offline
User avatar

retroleds

Guru

Guru

  • Posts: 3636
  • Joined: 04 Feb 2006, 10:34
  • Location: Surrounded by hicks and sticks (farms and woods) - Michigan,USA

: Hughes module battery contact pad

Post27 Feb 2009, 21:40

.002 is too thin. may as well put something decently strong on. I'm thinking .006-.10 should be fine.
http://www.retroleds.com - Sales of vintage LED, LCD, analog watches, parts and gadgets - repair tutorials & tips
Nov. 2022 - back in business!! BItter divorce is in home stretch, come grabs some great deals, I had to open the safe . . . damn attorneys. piss.
Offline
User avatar

LEDluvr

Guru

Guru

  • Posts: 1001
  • Joined: 06 Jun 2007, 22:49
  • Location: Los Angeles

: Hughes module battery contact pad

Post05 Mar 2009, 01:04

Thanks for the tip Ed, will do.

BTW - I read in another post that you are not taking any new repair
orders after March 1st. When will you be 'back in business' so to speak? (I'm thinking about some LCD's of mine that need work....)
Offline
User avatar

retroleds

Guru

Guru

  • Posts: 3636
  • Joined: 04 Feb 2006, 10:34
  • Location: Surrounded by hicks and sticks (farms and woods) - Michigan,USA

Re: : Hughes module battery contact pad

Post05 Mar 2009, 15:53

LEDluvr wrote:Thanks for the tip Ed, will do.

BTW - I read in another post that you are not taking any new repair
orders after March 1st. When will you be 'back in business' so to speak? (I'm thinking about some LCD's of mine that need work....)
Just need to take care of some of my own stuff for a few months, I'm hoping by July or August I will be getting stir crazy and want to resume repairs. I have some things to attend to that would cost me more to pay others to attend to then i can make off repairs for the same amount of time spent. Many repairs for others are just plain time consuming because they want THAT particular piece put together again. When fixing/assembling for my own purposes(ok, to sell!), I can make better decisions - best glass into best case, which gets best band and best box. My thinking is that there is no point in setting two lesser pieces out into the world of collectors -one with a nice case and chipped glass, another with perfect glass and a dinged case. Re-assemble those pricks as one mint piece and one daily wearer! So between shoving the last repairs out, I have been finishing off a bunch of pieces and will hopefully get a LOT posted up during the next two weeks. 6-7 Bulova drivers, 4-5 solid gold Pulsars and a handful of other Pulsars, a nice mix of vintage LCDs(Seikos, PUlsar,Optel). and of course, LEDs of all stripes. Hey, weren't you the one after me for a Seiko H357? Got that all polished up yesterday......write me! :lol:
http://www.retroleds.com - Sales of vintage LED, LCD, analog watches, parts and gadgets - repair tutorials & tips
Nov. 2022 - back in business!! BItter divorce is in home stretch, come grabs some great deals, I had to open the safe . . . damn attorneys. piss.
Offline
User avatar

LEDluvr

Guru

Guru

  • Posts: 1001
  • Joined: 06 Jun 2007, 22:49
  • Location: Los Angeles

: Hughes module battery contact pad

Post05 Mar 2009, 21:12

Sounds like you are very busy these days. I hear you, you have bigger fish to fry at this time. Plus it helps the community to have more good working vintage digitals out there. 8-)
As long as you go back to doing repairs for the rest of us in a few months! Finding a good & honest LED/LCD repairman is next to impossible. And I'll pm you about that Seiko...
Offline
User avatar

LEDluvr

Guru

Guru

  • Posts: 1001
  • Joined: 06 Jun 2007, 22:49
  • Location: Los Angeles

: Hughes module battery contact pad

Post09 Jul 2009, 00:08

Update on this Hughes module repair:

I finally got to soldering that contact pad last weekend. I cleaned the moudule thouroughly too. I reconnected the original quartz crystal and the moudle lights up nice and bright now! :-D
But I'm still only getting one number - either a "0" or "1" in various spots. It changes everytime I take out a battery and replace it again.

Soooo... I was wondering....
I simply pushed the orignal three prong q.c. back into place. I couldn't find any silver oxide to bond it with. (Even electronic stored didnt' carry it.)
Could this be the problem?
Should I try a new q.c? I have some two prong ones that I bought from Ed, would they work? If so - should I just place them in the outer holes and ingnore the middle?
Thanks!

Hey all,

I have a larger digit Hughes module that had some of the "green death" leaked onto the negative battery contact pad. I cleaned it up with iso alcohol and most of the pad came off. I put in new batteries just for the heck of it - and it lit up!

Sometimes I get a "0" or a "1" in one of the two right fields, and sometimes I get it to the setting stage, i.e.- the "1 -" for setting the month. But it won't let me set it. At this point I'd like to try to repair the negative battery contact pad to see it it's a runner. Any suggestions??
Offline
User avatar

retroleds

Guru

Guru

  • Posts: 3636
  • Joined: 04 Feb 2006, 10:34
  • Location: Surrounded by hicks and sticks (farms and woods) - Michigan,USA

: Hughes module battery contact pad

Post09 Jul 2009, 04:11

Mike(LedLuvr)
Those q.cs I sent you won't work on a Hughes.- wrong frequency by a factor of roughly 24. The silver epoxy - generally have to order that from somewhere like Mouser.com Don't be too shocked - it is about $25 for two, 1/8 oz. tubes. Then again, used carefully, that is enough for at least 100 repairs. IF you get some, mix a small amount(equal amounts A & B), then let it sit for a minute, it will usually get a little smoother in consistency. Then take a needle and dip into your pile and pull straight out - that will give you a nice thin tip of epoxy to carefull push into the hole. Repeat a couple of times and you probably have plenty in it. If you get messy, take a q-tip(cotton swab) dipped in alcohol and wipe up the mess - just a trace will short things out. Leave none on the side of the board the q.c. goes into - it will squish up the leads and short against the "can" of the crystal, for sure. Just push your q.c. in and let it dry over night. If it works, I suggest you put a small drop of regular epoxy on one side or both of the q.c. to bond it to the board...the silver epoxy is not particularly strong itself.

May the Force be with you.
http://www.retroleds.com - Sales of vintage LED, LCD, analog watches, parts and gadgets - repair tutorials & tips
Nov. 2022 - back in business!! BItter divorce is in home stretch, come grabs some great deals, I had to open the safe . . . damn attorneys. piss.
Offline
User avatar

LEDluvr

Guru

Guru

  • Posts: 1001
  • Joined: 06 Jun 2007, 22:49
  • Location: Los Angeles

: Hughes module battery contact pad

Post09 Jul 2009, 18:50

Thanks for the sage advice Ed.
I'll pick some silver epoxy from mouser after I finish getting my darn Date II running again. I'll pick up a few q.c.'s too, just in case. What is the correct frequency q.c. for Hughes modules?
Offline
User avatar

retroleds

Guru

Guru

  • Posts: 3636
  • Joined: 04 Feb 2006, 10:34
  • Location: Surrounded by hicks and sticks (farms and woods) - Michigan,USA

: Hughes module battery contact pad

Post09 Jul 2009, 18:59

786,432 HZ ....they haven't been made in years. So you get one from a module that was keeping good time but had a display issue. I never throw one away.

You know, pm time.

Ed
http://www.retroleds.com - Sales of vintage LED, LCD, analog watches, parts and gadgets - repair tutorials & tips
Nov. 2022 - back in business!! BItter divorce is in home stretch, come grabs some great deals, I had to open the safe . . . damn attorneys. piss.

Return to Electronical

Who is online

Users browsing this forum: No registered users and 54 guests