It is currently 28 Apr 2024, 22:33


NO joined effort : remake of the seiko f231-500a..update

For electronic related stuff like module repair, silver epoxy fixes etc.
  • Author
  • Message
Offline
User avatar

Kasper

Guru

Guru

  • Posts: 2442
  • Joined: 25 Aug 2011, 10:25
  • Location: Belgium

NO joined effort : remake of the seiko f231-500a..update

Post17 Dec 2011, 13:39

I promessed the little Seiko to someone on this board for the same price that i got it.
But first we have to clean it up so it is worth giving.

but lets make this one a joined effort so we could all learn a bit from it.

first thing first....this is the watch...what would you do to it.
as you could all see..the glass is bad...and the black is full with dents.

Image

my idea was to get rid of the glass..to many scratches and clean up the case with some mild sanding paper..600 is to rough..so 1200 on top silver would be good..and some polishing afterwards on the sides of the case. I like to do the up and down case side with a slightly matt finish and the small steel bezel round the glass a shiny finish like the 2 sides.
But what can we do with the black??
And how do we get rid of the glass. It is not put in with a rubber bezel like other seikos. Do we make it hot or....

i have idea's enough, but this time i want to hear yours....
You need more detailed pictures..just tell me.

How would you do it??
Last edited by Kasper on 22 Dec 2011, 19:24, edited 1 time in total.
Offline
User avatar

Kasper

Guru

Guru

  • Posts: 2442
  • Joined: 25 Aug 2011, 10:25
  • Location: Belgium

: joined effort : remake of the seiko f231-500a

Post22 Dec 2011, 19:13

Hi Kasper,

Very interesting read and NO, i have no idea what to do. I'm just here to see what other have to say and offcourse to see all those naked girls :-D
and yess i know..this is a forum...but as you know.....
Collectors are boring, asocial, jealouse people and even do some have jobs in the watch business, they rather like to die with all there knowledge then share it. !@@!
Offline
User avatar

Kasper

Guru

Guru

  • Posts: 2442
  • Joined: 25 Aug 2011, 10:25
  • Location: Belgium

: joined effort : remake of the seiko f231-500a

Post22 Dec 2011, 19:23

thx Kasper for your honest reply. Let the real collector stand up then :-D

So in this joined effort...me, myself and i tried to get the glass out of the watch :-)

first i made a mall out of carbon for strenght.

Image

Then i heated the case..and tried to push it out but i felt it moving and then
disaster struck..the glass is bigger then the black metal.

Image

Image
Image

so now it was desicion time..if i push further the black metal would get worse..so i had to break the glass to save the black metal.

Image

and now i was angry that i did not see that one comming...i checked the glass several times before trying this..i could not see it.
So in my frustration i decided to get the 4 pins out of the case. and heat it up so i could get the black metal off.

so far so good.

Image

so whats next???? how do i remake the black metal.

Hints or idea's always welcome M:)W:)M
Offline
User avatar

bucko170

Guru

Guru

  • Posts: 3647
  • Joined: 20 Oct 2007, 11:47
  • Location: Nottinghamshire: The Home of Robin Hood..... UK

: NO joined effort : remake of the seiko f231-500a

Post22 Dec 2011, 20:35

Hi Kasper,

After the excellent job you did earlier with the Pulsar glass I think everyone was waiting for your lead ;-)

Would it be possible to rub the metal plate down, respray it and replace the lettering either using lettering transplanted from another watch or transferable 'rub on' lettering.

A respray would allow you to choose your own colour if you fancied something different or maybe it could even be re-plated or just buffed to a shine if the base metal permits this.

I had a Breitling refurbished and the number 10 was replaced using transferable lettering, see photo below.....

(black number 10 around the 2 o'clock position)
http://www.dwf.nu/Gallery/displayimage. ... play_media
Offline
User avatar

Kasper

Guru

Guru

  • Posts: 2442
  • Joined: 25 Aug 2011, 10:25
  • Location: Belgium

: NO joined effort : remake of the seiko f231-500a

Post23 Dec 2011, 13:19

nice job on the breitling. The problem here is that rub on letters will not stay on it..no protection from glass.

oke, let's first do what i can do :-D

new glass...handmade

Image
Image
Image

the new glass is neady..now the preparations for the black plate.
I wanted to keep the letters so i put a litlle platic cement on them to protect them a bit.

Image
Image

from here it's trouble in paradise :-? ..i have no idea how i can recover the black plate without losing the letters. I tried to sand it off in differend ways but the biggest problem is to do an even sanding.

if i try to make a clean sanding..i loose the letters..
thats what i have sofar...ugly :-)

Image

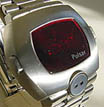
btw here is another that arrived yesterdag at my doorstep...it's very comfy to wear and you can see everything time+date in one view.

Image

so i need idea's for the black plate...how can i do an even sanding withoud losing the letters?
How do i put a decent strong black coating on it. I spray it on for an even view?
Do i bake it in the oven??
How did Seiko did it in the first place...did they spray it on and baked it afterwards or ...?[/img]
Offline
User avatar

bucko170

Guru

Guru

  • Posts: 3647
  • Joined: 20 Oct 2007, 11:47
  • Location: Nottinghamshire: The Home of Robin Hood..... UK

: NO joined effort : remake of the seiko f231-500a

Post23 Dec 2011, 14:39

Does the black coating need to be removed entirely?

Could the letting be masked out with tape, then sprayed with a base paint before applying a new coat of black paint and finished off with a clear sealing/protective coat.
Offline
User avatar

Kasper

Guru

Guru

  • Posts: 2442
  • Joined: 25 Aug 2011, 10:25
  • Location: Belgium

: NO joined effort : remake of the seiko f231-500a

Post23 Dec 2011, 17:27

the only way, i could make it better is when i get it all off and try to polish the scratches out of the plate. But the tricky part is to get is polished or sanded evenly.
I have to lay it aside for a while..so i could think what my next step is...don't want to overrush and do something wrong at this step.

or does anyone has a new plate for me...black if possible M:)W:)M
Offline
User avatar

charger105

Guru

Guru

  • Posts: 867
  • Joined: 02 Mar 2007, 02:11
  • Location: Australia

: NO joined effort : remake of the seiko f231-500a

Post25 Dec 2011, 01:38

Hi Kasper.
You could scan it, photoshop it, and then get it printed onto aluminium (of virtually any thickness).
I investigated doing this once, but it was quite expensive. The guy didn't seem very interested, and quoted quite a high price.

If you can find a sympathetic company who'll do such a small job at a realistic price, you'll be in business !!

Rgds,
Andrew.
Offline
User avatar

Kasper

Guru

Guru

  • Posts: 2442
  • Joined: 25 Aug 2011, 10:25
  • Location: Belgium

: NO joined effort : remake of the seiko f231-500a

Post26 Dec 2011, 00:14

thx Andrew,

another 2 guys with a ++ sign in my little book :-D

yes i was thinking that myself to...but i did not know you could print on metal. Maybe a could try it myself..just tape the plate on a white paper and put it in my printer :-D

Maybe it will work, who knows....oke..now i have to do some studying..where and how can i print on metals.
Offline

quietman

Techie

Techie

  • Posts: 153
  • Joined: 05 Nov 2011, 22:16
  • Location: Respectably Vagrant

: NO joined effort : remake of the seiko f231-500a

Post26 Dec 2011, 00:54

There's a method that folk use for bashing together PCBs that uses relatively cheap and available gear.... It would require plenty of experimentation and would only be worth working through the inevitable learning curve if you were doing it more than once or using the gear for other similar things. But you did ask. And you're threats to pass the thing through your printer weren't so very far away......

You scan and reverse the image in photoshop. Then you print it onto a non-porous substrate (photo paper or similar) using a laser printer. The laser printer basically fuses the toner into a thin layer of plastic lettering on the coated paper.

Then you place the print face down onto the piece you want to transfer the image to and use heat to 'reflow' the printed toner. Most folks sandwich the print and a PCB blank togethter and use repeated passes through a normal or modified desktop/office laminator. I can think of other domestic items that could also be modded to acheive the same thing. You would probably aim to have high local but transient heat (like the fusing in a laser printer or like in a laminator). Sticking the whole thing in an oven would probably melt everything before you got the toner transferred over.

Its a pretty common 'method' for PCB work (strictly bush-league) and I've been thinking of trying this out with some watch parts but haven't got the gear or time-energy to hand right now. No idea how well it would work with this lettering/logos onto watches. For a start you can't easily do white though just about every other colour is possible if you have a colour laser.

There's a chance it could be made to work but would require some experimentation. Normally you can transfer a print of better than 100 micron resolution onto copper.

Whole lot of stuff to think about including -

Print settings (most colour printers have a photo setting that lays down extra toner....)
Melting temperature of toner
Melting temperature of chosen print substrate
Melting/softening temperature of target substarte and any other paint finishes on it
Heating temperature of laminator or other 'reflow' equipment before/after modification.
SAFETY ISSUES with modding any heat generating or mains equipment.
Possible need for a laquer or similar to stabilise the lettering after transfer.

Merry Xmas.

MP.
Offline
User avatar

Kasper

Guru

Guru

  • Posts: 2442
  • Joined: 25 Aug 2011, 10:25
  • Location: Belgium

: NO joined effort : remake of the seiko f231-500a

Post31 Dec 2011, 13:01

thx MP for the detailed explanation.

i tried specialty paper for melting pictures on t-shirt...no go.
i have no laser printer..but that not a problem..there are cheap these days.

but i had an other idea...could i use a cd/dvd labeler like this one?

Image

http://www.youtube.com/watch?v=WyHi6hQ1 ... r_embedded
still some questions:

- does it need a special layer on the cd/dvd to write on?
- would it work on glass to.

imagine you just cut the form of the watchdial or plate out of a cd and lay the platic or glass one into it to print on.

or even better...just stick or glue a thin platic layer..over the cd..so you could print on it and transfer it to the dial afterwards.
Offline
User avatar

bucko170

Guru

Guru

  • Posts: 3647
  • Joined: 20 Oct 2007, 11:47
  • Location: Nottinghamshire: The Home of Robin Hood..... UK

Re: : NO joined effort : remake of the seiko f231-500a

Post31 Dec 2011, 18:15

kasper wrote:or even better...just stick or glue a thin platic layer..over the cd..so you could print on it and transfer it to the dial afterwards.


Could transparency film for overhead projectors be used?

EG: http://www.nextag.com/transparency-film ... mpare-html
Offline

quietman

Techie

Techie

  • Posts: 153
  • Joined: 05 Nov 2011, 22:16
  • Location: Respectably Vagrant

: NO joined effort : remake of the seiko f231-500a

Post31 Dec 2011, 18:53

One potential issue with the CD printer for these tiny letters might be the print resolution. Fine resolution is where the laser wins but being able to print directly onto the work-piece without f'ing about with reversing and reflowing is very appealing.

I know you can use acetate(?) film in the laser printer/laminator print transfer method I described if you keep the temps down. This usually means you have to make more passes through the laminator which then risks registration errors. I presume you can use it in a thermal transfer printer (I think thats what the CD one was?) too as the transfer/fusing temperatures are a bit lower than a laser.

I'm not convinced how well a thermal transfer printer (or laser toner for that matter) would adhere directly to glass. Its basically just thermoplastic loaded with dye and most plastics don't stick well to glass. You might need a thin spray coat of laquer over the top to give it some help.
Offline

Keenan

Newbie

Newbie

  • Posts: 1
  • Joined: 25 Jul 2011, 07:44

: NO joined effort : remake of the seiko f231-500a

Post02 Jan 2012, 00:18

I'm new to this forum but have been nosing around its' posts for a few weeks now, and thought I might give my 2 cents on how to repaint your black metal plate. What might work for this is a laser engraver. Basically the laser engraver is just a table where you set your part, and the laser can either cut lines on or through things (vector cutting) or etch text or graphics into things one thin line at a time like a printer (raster engraving). I don't know where you would get access to one, but there are cheap small ones (albeit of suspect calibre or usefulness) for sale on ebay. I had access to a professional grade one for a course I took and I loved that machine.

Here's the steps I would probably take,

1. Draw up cad files for all the details of the metal face, the outline of it, the text, and the outline of the lighter gray area.
2. Refinish the plate so its smooth. You might even do well to flip it over if you can.
3. Cut an acrylic jig for the plate using the laser cutter. Just a square with a hole cut to the same shape as the part so it can be aligned to a corner of the cutting surface on the laser engraver. This way it is lined up perfectly every time.
4. Paint the whole metal plate the dark grey color.
5. Lay a high quality low stick masking tape over the surface of the dried grey paint, and use the laser on a very low power to score the tape at the edges of the black areas. With such small tolerances look for a tape specially treated to stop paint bleed.
6. Peel of the masking tape you don't need and paint the black areas.
7. After the black areas have dried, remove the tape and use the laser to etch the text into the grey paint (raster engraving), revealing the shiny base metal.

This is probably more trouble than it is worth, but would work well if:
-You can draw the cad files to your liking
-You have good alignment when placing the piece in the machine
-You get no paint bleed or peeling with the masking tape
-The resolution/precision of the machine is good enough for such precision work. At these small sizes the width of the laser beam might come into play, or you might be able to notice each step of the stepper motor moving the laser assembly.
-You do a few test runs on a scrap piece of metal to get the laser power setting right.
Offline
User avatar

Kasper

Guru

Guru

  • Posts: 2442
  • Joined: 25 Aug 2011, 10:25
  • Location: Belgium

: NO joined effort : remake of the seiko f231-500a

Post03 Jan 2012, 17:05

yesss!! we are getting somewhere.

Thx MP,Keenan and Bucko...these are all possibilities i'm studying right now. I have a few questions running to some companies at the moment.

I was wondering how they did it 30 years ago?
There was no Cadcam or no laser or no cnc.

we need something like this?
250957117828 : ebay

or like this : 250875895066
Offline

quietman

Techie

Techie

  • Posts: 153
  • Joined: 05 Nov 2011, 22:16
  • Location: Respectably Vagrant

: NO joined effort : remake of the seiko f231-500a

Post03 Jan 2012, 20:13

That C02 laser is quite cute! A decade and a half ago I did my university industrial internships at a company that made multi-kilowatt C02 lasers for cutting steel plate. They were the size of a van, hummed along at many kV and had very cool blue gas plasma rings - pace-makers not allowed in the room. We also made little ND-YAG lasers for engraving as the beams were more manageable. I digress.

The original Seiko printing may have been done using screen printing or some sort.
Offline
User avatar

Kasper

Guru

Guru

  • Posts: 2442
  • Joined: 25 Aug 2011, 10:25
  • Location: Belgium

Re: NO joined effort : remake of the seiko f231-500a

Post16 Feb 2013, 00:50

ok..i tried it.

spray painted it...2 times but the results were... :~# :~#

so i there goes another project down the drain...damn restoring isn't easy :amen: but i tried.

hmmm looking good from far!

Image
Image
Image

ooohh damn...looking far from good! :~#

Image
Image

so i pulled it back off and eat it up :grin1:
btw look Abe, there is your extra handcut glass for your f231 ;-)

Image
Image
Image

so we are still searching for a black original coverplate from seiko.
Hey you all...this board is FREE and without ADS, so at least post something every now and then to show your appreciation.


Get the latest active topics of the board here.
http://www.newdwf.com/search.php?search_id=active_topics

- Kasper -
Offline

Adam

Techno Mage

Techno Mage

  • Posts: 611
  • Joined: 30 Oct 2007, 03:44

Re: NO joined effort : remake of the seiko f231-500a..update

Post16 Feb 2013, 10:12

Kasper until you find one is it not possible for you to print onto thin but high gloss paper the fascia, then cut a thin acrylic plate to go on top? Not perfect but should look similar.


Adam
http://www.digital-watch.com - online database of 2000+ watches, manuals and adverts from the 70s-90s
http://www.vintagelcd.com - Vintage Digital Watches for sale

Return to Electronical

Who is online

Users browsing this forum: No registered users and 99 guests